Keurig Coffee Maker Filter Replacement: What You Need to Know (and What Most People Get Wrong)
Roon Team
Keurig Coffee Maker Filter Replacement: What You Need to Know (and What Most People Get Wrong)
Your Keurig is probably overdue for a keurig coffee maker filter replacement. Most people don't even realize their machine has a water filter, let alone that it needs replacing on a regular schedule. And that matters more than you think, because the water running through your brewer affects everything from taste to machine longevity.
A proper keurig coffee maker filter replacement takes about two minutes, though the principles behind general coffee filter replacement apply across most brewer types. Skipping it can cost you months off your machine's lifespan and turn every cup into a slightly worse version of what it should be.
Here's the full breakdown: what the filter does, when to swap it, which one fits your model, and how to handle your keurig coffee maker filter replacement without overthinking it.
Key Takeaways:
- Keurig water filters should be replaced every 2 months or every 60 tank refills, whichever comes first.
- The filters use activated charcoal to remove chlorine, calcium, and other impurities from tap water.
- A neglected filter leads to off-tasting coffee, mineral buildup, and potential mold growth in the reservoir.
- Both OEM Keurig filters and third-party options work across most 1.0 and 2.0 models.
What Does the Keurig Water Filter Actually Do?
The small, oval cartridge that sits inside your Keurig's water reservoir is an activated charcoal filter. It's made from coconut shell carbon, and its job is straightforward: trap contaminants before they reach your coffee. Understanding this cartridge is the first step toward a proper keurig coffee maker filter replacement.
Specifically, these filters remove chlorine, calcium, odors, and sediment from your tap water as it passes through the cartridge. Some third-party filters also claim to reduce trace metals like copper, mercury, and cadmium, though results vary by brand and water source.
Chlorine is the big one. Municipal water treatment plants add it to kill bacteria, but it does terrible things to coffee flavor. Even small amounts can make a cup taste flat or chemical. The charcoal absorbs chlorine molecules on contact, so by the time water hits your K-Cup, it's cleaner.
Calcium is the other concern. Hard water leaves mineral deposits (limescale) inside your brewer's heating element and internal tubing. Over time, that buildup interferes with brewing temperature and slows the machine down. A working filter reduces the rate of scale accumulation. It won't eliminate it entirely, but a timely keurig coffee maker filter replacement buys you time between descaling cycles.
How Often Should You Complete a Keurig Coffee Maker Filter Replacement?
The standard recommendation, straight from Keurig and echoed by most filter manufacturers: every two months or after 60 reservoir refills. Best Buy's product Q&A for Keurig brewers confirms this guideline, and it's consistent across both OEM and third-party filter packaging.
Some sources cite 40 gallons as the threshold instead of 60 refills. The numbers don't conflict; they just measure differently depending on reservoir size. For a standard Keurig with a 48-oz tank, 60 refills works out to roughly 22 gallons. But if you're brewing 6 to 8 cups a day, you'll hit that limit well before the two-month mark, meaning your keurig coffee maker filter replacement schedule should be more frequent.
Here's a simple rule: if you brew daily, change the filter every 8 weeks. If you only brew a few times per week, the two-month window still applies because the charcoal degrades over time even when sitting in water.
Signs Your Filter Is Past Its Prime
You won't always remember when you last completed a keurig coffee maker filter replacement. Watch for these signs instead:
- Your coffee tastes different. Flat, slightly metallic, or just "off." This is usually the first sign.
- Visible particles or discoloration in the reservoir. Charcoal fragments can start to escape a worn-out filter.
- Your machine is due for descaling more often. If you're seeing the descale light every few weeks, the filter may not be catching enough calcium.
- It's been more than three months. At that point, the activated carbon is largely spent regardless of how much water has passed through it.
Any of these symptoms means it's time for a keurig coffee maker filter replacement right away.
Which Filter Fits Your Keurig? A Compatibility Guide
This is where people get confused during a keurig coffee maker filter replacement. Keurig has released dozens of models over the years, and the filter system has evolved with them. The good news: most filters are universal across the 1.0 and 2.0 platforms.
Here's a quick compatibility reference:
| Keurig Series | Compatible Filter Type | Filter Holder Needed? |
|---|---|---|
| 1.0 Classic (K40, K45, K55, K60, K65, K70, K75) | Standard charcoal cartridge | Yes, tall or short holder depending on reservoir |
| 2.0 Series (K200, K250, K300, K350, K400, K450, K475) | Standard charcoal cartridge | Yes, rear-reservoir holder |
| K-Classic, K-Select, K-Elite | Standard charcoal cartridge | Yes, tall holder |
| K-Mini, K-Slim, K-Express | Standard charcoal cartridge | Yes, side-loaded holder |
| K-Supreme, K-Duo, K-Cafe | Standard charcoal cartridge | Yes, side-loaded holder |
The charcoal cartridge itself is essentially the same across all models. What changes is the filter holder assembly, the plastic housing that clips into the reservoir and holds the cartridge in place. Keurig sells starter kits that include one holder and two filter cartridges. After that, you only need to buy replacement cartridges for each keurig coffee maker filter replacement going forward.
If you're not sure which holder your machine uses, check whether your reservoir loads from the top or the side. Top-loading reservoirs (most older models) use a tall or short holder that drops in from above. Side-loading reservoirs (K-Supreme, K-Slim, K-Express) use a holder that clips to the interior wall.
Keurig OEM vs. Third-Party Filters: Does It Matter for Your Keurig Coffee Maker Filter Replacement?
Keurig's own replacement filters run about $7 to $9 for a two-pack. Third-party options from brands like GoodCups, Possiave, and K&J are cheaper, often coming in 6- or 12-packs for $8 to $15 total. The choice you make here affects the long-term cost of every keurig coffee maker filter replacement.
The core material is the same: activated coconut shell charcoal. Third-party filters are designed to replace Keurig's original part 05073 and fit the same holder assembly. In blind taste tests, most people can't tell the difference.
Here's a realistic comparison:
| Factor | Keurig OEM | Third-Party (GoodCups, K&J, etc.) |
|---|---|---|
| Price per filter | ~$3.50–$4.50 | ~$0.75–$1.50 |
| Material | Activated coconut charcoal | Activated coconut charcoal |
| Fit | Exact fit guaranteed | Universal fit, occasional slight looseness |
| Filtration claim | Removes chlorine, calcium, odors | Same claims, some add mercury/cadmium |
| Availability | Keurig.com, Amazon, retail | Amazon, Walmart, brand websites |
The practical difference is minimal. If you want zero risk of a loose fit, go OEM for your keurig coffee maker filter replacement. If you want to save money and don't mind a cartridge that occasionally needs a gentle push to seat properly, third-party works fine.
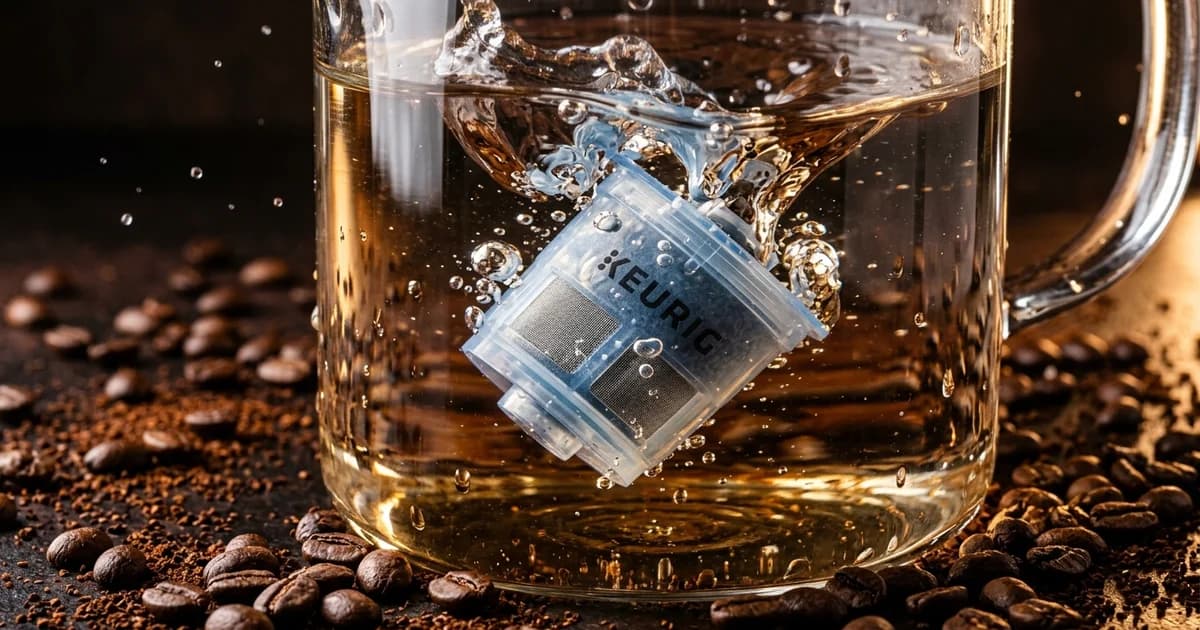
How to Complete Your Keurig Coffee Maker Filter Replacement (Step by Step)
The whole process takes less than five minutes, including the prep soak. A keurig coffee maker filter replacement is one of the simplest maintenance tasks you can do for your brewer.
What You'll Need
- One new charcoal filter cartridge
- A cup of clean water for soaking
- Your Keurig's filter holder assembly (already installed in most machines)
The Process
-
Soak the new filter. Drop the fresh cartridge into a cup of water and let it sit for 5 minutes. This saturates the charcoal and rinses away any loose carbon dust. You'll notice the water turns slightly gray. That's normal.
-
Rinse the filter. After soaking, hold the cartridge under running water for about 60 seconds. This flushes out remaining fine particles.
-
Remove the reservoir. Pull the water tank off your Keurig and dump out any remaining water.
-
Open the filter holder. If you have a top-loading reservoir, the holder sits at the top of the tank, held by a clip. Pull it out. For side-loading reservoirs, the holder is attached to the interior wall of the tank. Unclip it.
-
Swap the cartridge. Pop out the old filter and press the new one into the holder. It should snap in with light pressure. The flat side faces down in most assemblies.
-
Reassemble and refill. Click the holder back into the reservoir, fill the tank with fresh water, and run one or two brew cycles without a K-Cup to flush the system. Discard that water.
That's it. Your keurig coffee maker filter replacement is done. Set a reminder on your phone for 8 weeks out.
Why a Dirty Filter Is Worse Than No Filter
Here's something most Keurig owners don't consider: skipping a keurig coffee maker filter replacement doesn't just leave you with a non-working filter. A spent charcoal filter can actually make things worse.
Activated carbon has a finite number of binding sites. Once they're full, the filter stops trapping contaminants. But in warm, moist environments, a saturated filter can become a breeding ground for bacteria and mold. A 2011 study by NSF International found that coffee maker reservoirs ranked among the top 10 germiest spots in the average home, with 50% of surveyed households showing yeast and mold in their coffee reservoirs.
The filter itself isn't the only culprit, but a neglected one contributes to the problem. Warm, standing water plus organic material trapped in exhausted charcoal is exactly the environment microorganisms love.
Completing a keurig coffee maker filter replacement on schedule and rinsing the reservoir weekly with warm, soapy water eliminates most of this risk. If you haven't changed your filter in six months or more, don't just swap it. Clean the entire reservoir and run a full descaling cycle while you're at it.
The Bigger Picture: Water Quality and Your Daily Caffeine
All of this effort, the filters, the descaling, the keurig coffee maker filter replacement routine, serves one purpose: making sure the water that brews your coffee is clean enough to let the actual flavor come through. Hard water mutes flavor notes and can introduce metallic tastes, while chlorine flattens everything into a dull, chemical sameness.
But here's a question worth sitting with: how much of your daily caffeine ritual is about the coffee itself, and how much is about the energy?
If you're maintaining a Keurig mostly because you need the caffeine to function, you're managing a supply chain for a stimulant. The beans, the water, the keurig coffee maker filter replacement schedule, the descaling solution, the K-Cups. It's a lot of infrastructure for 80 to 100mg of caffeine that peaks fast and drops you into a crash 90 minutes later.
Roon takes a different approach. It's a zero-nicotine sublingual pouch that delivers 80mg of caffeine paired with L-Theanine, Theacrine, and Methylliberine, a combination designed for sustained, smooth energy over 6 to 8 hours. No brewing. No filters. No crash. The caffeine is comparable to a cup of coffee, but L-Theanine smooths the onset while Theacrine and Methylliberine extend it, so you get hours of clean focus without the spike-and-crash cycle.
Keep your Keurig for the mornings when you want the ritual. But for the energy itself, there's a simpler option.